
With Americans spending more time at home than ever due to the Coronavirus, it’s no surprise that the average homeowner has put some additional strain on their plumbing system. At Carter Quality Plumbing, we are proud to always be here for you, providing essential plumbing service in good times and bad. However, we also believe in doing everything we can to educate our customers and help keep their plumbing equipment safe.
For instance, if you are stuck at home with a clogged toilet, don’t freak out—simply follow the proper steps. Toilet clogs are a frustrating problem, but they are easy enough to take care of if you have the proper tools. Just remember, no matter how desperate you get in the future, avoid flushing anything but regular toilet paper down the toilet. In the meantime, keep reading to learn the best way to unclog a toilet, and make sure to call our experienced plumbers for all the essential plumbing services you need.
The 10 Essential Steps to Unclogging Your Toilet:
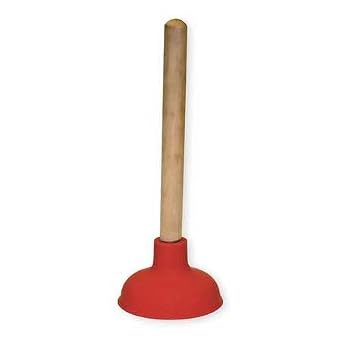
- Make Sure You Have the Right Plunger: A lot of people assume that a plunger is a plunger, and any kind will do when it comes to taking care of clogs. However, with toilet clogs specifically, you will want to make sure you have what is known as a flange plunger, also sometimes simply called a “toilet plunger.” You will be able to identify the flange as the rubber flap that juts out from the plunger cup’s end. The flange plumber stands in contrast to the regular sink plunger, sometimes called a “cup plunger” because of the flat cup on the end. Unlike with the sink plunger, the flange is able to create a tighter seal when you are unclogging a toilet, guaranteeing the suction you need to plunge directly from your toilet’s drain hole. If you do not have a flange plumber lying around, you should purchase one online, as this device will be far superior to the cup plunger when it comes to dealing with clogged toilets.
- Put Towels Around the Base of the Toilet: Plunging your toilet can be a dirty job. To ensure things don’t get too messy, it is a good idea to clear the area around your toilet and line the base with some old towels, paper towel, or plastic wrap. This will offer your floor some protection in case any spillage occurs (if your toilet begins to overflow, turn off the supply valve at the base of the unit and call a professional ASAP.) You may also want to put on rubber gloves and boots before you begin plunging, just to keep yourself as clean as possible.
- Fill the Bowl Halfway: Plunging tends to be more effective when the toilet bowl is filled about halfway with water. If there is a lack of water in your toilet, just pour a few cups in. Warm water tends to work best. If, on the other hand, your toilet bowl is more than halfway full, take a few cups out. The goal is to guarantee there is enough water in the bowl to submerge the plunger, thus improving suction, but not enough water that an overflow occurs once you have taken care of the clog.
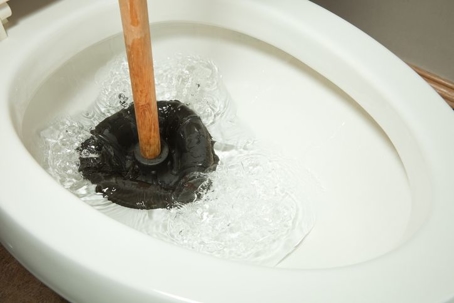
- Insert the Flange into the Drain: The flange of your plunger should fit tightly inside your toilet drain. Insert the flange on an angle. You should be able to see the flap fill as you lower your plunger into the water.
- Create the Seal: Once the head of your plunger is submerged in the water, and the flange is directly inside the toilet drain, you should be able to position the cup to create a seal. If your plunger is in good condition and there is sufficient water in the toilet, you should be able to achieve enough suction to adequately remove a clog.
- Test the Plunger: Before you officially commence plunging, you may want to test your plunger once. Press down slowly, checking that the seal is tight and will stay in place throughout the plunging process. If you have trouble maintaining a seal, some homeowners have suggested that you can achieve tighter suction by smearing some petroleum jelly around the plunger cup.
- Plunge for 20 Seconds: Ideally, you should plunge for no longer than 20 seconds at a time, depressing the plunger no more than 5-6 times in a row. Remember, do not perform this motion too fast, as this can mess up your seal and cause overflowing.
- Repeat as Necessary: You should repeat step seven of the plunging process as many times as necessary to get rid of your clog. Make sure to check the bowl occasionally, ensuring you have enough water. If necessary, pour a few more cups of water in.
- Check Your Toilet Handle: After you have spent an adequate amount of time plunging your toilet, remove the tank lid and try the handle. If it works like usual, congratulations, your clog is gone and you can flush like normal again. If the toilet won’t flush and the bowl starts filling with water, close the toilet’s flapper manually to prevent the bowl from overflowing.
- Know When to Try a Plumber: Although you may have to repeat the plunging process several times, there comes a point when it is better to just call a plumber. The next time you can’t get rid of a clog, and you have plunged your toilet four or five times, make sure to contact Carter Quality Plumbing. Our experts are available 24/7 for emergency appointments, and if you do need to upgrade your toilet, we offer extensive remodeling options, so you always receive hardware that is energy-efficient and designed to last for years to come.
For more plumbing tips and tricks, call Carter Quality Plumbing today at (803) 998-2270, or click here to send us a message online.